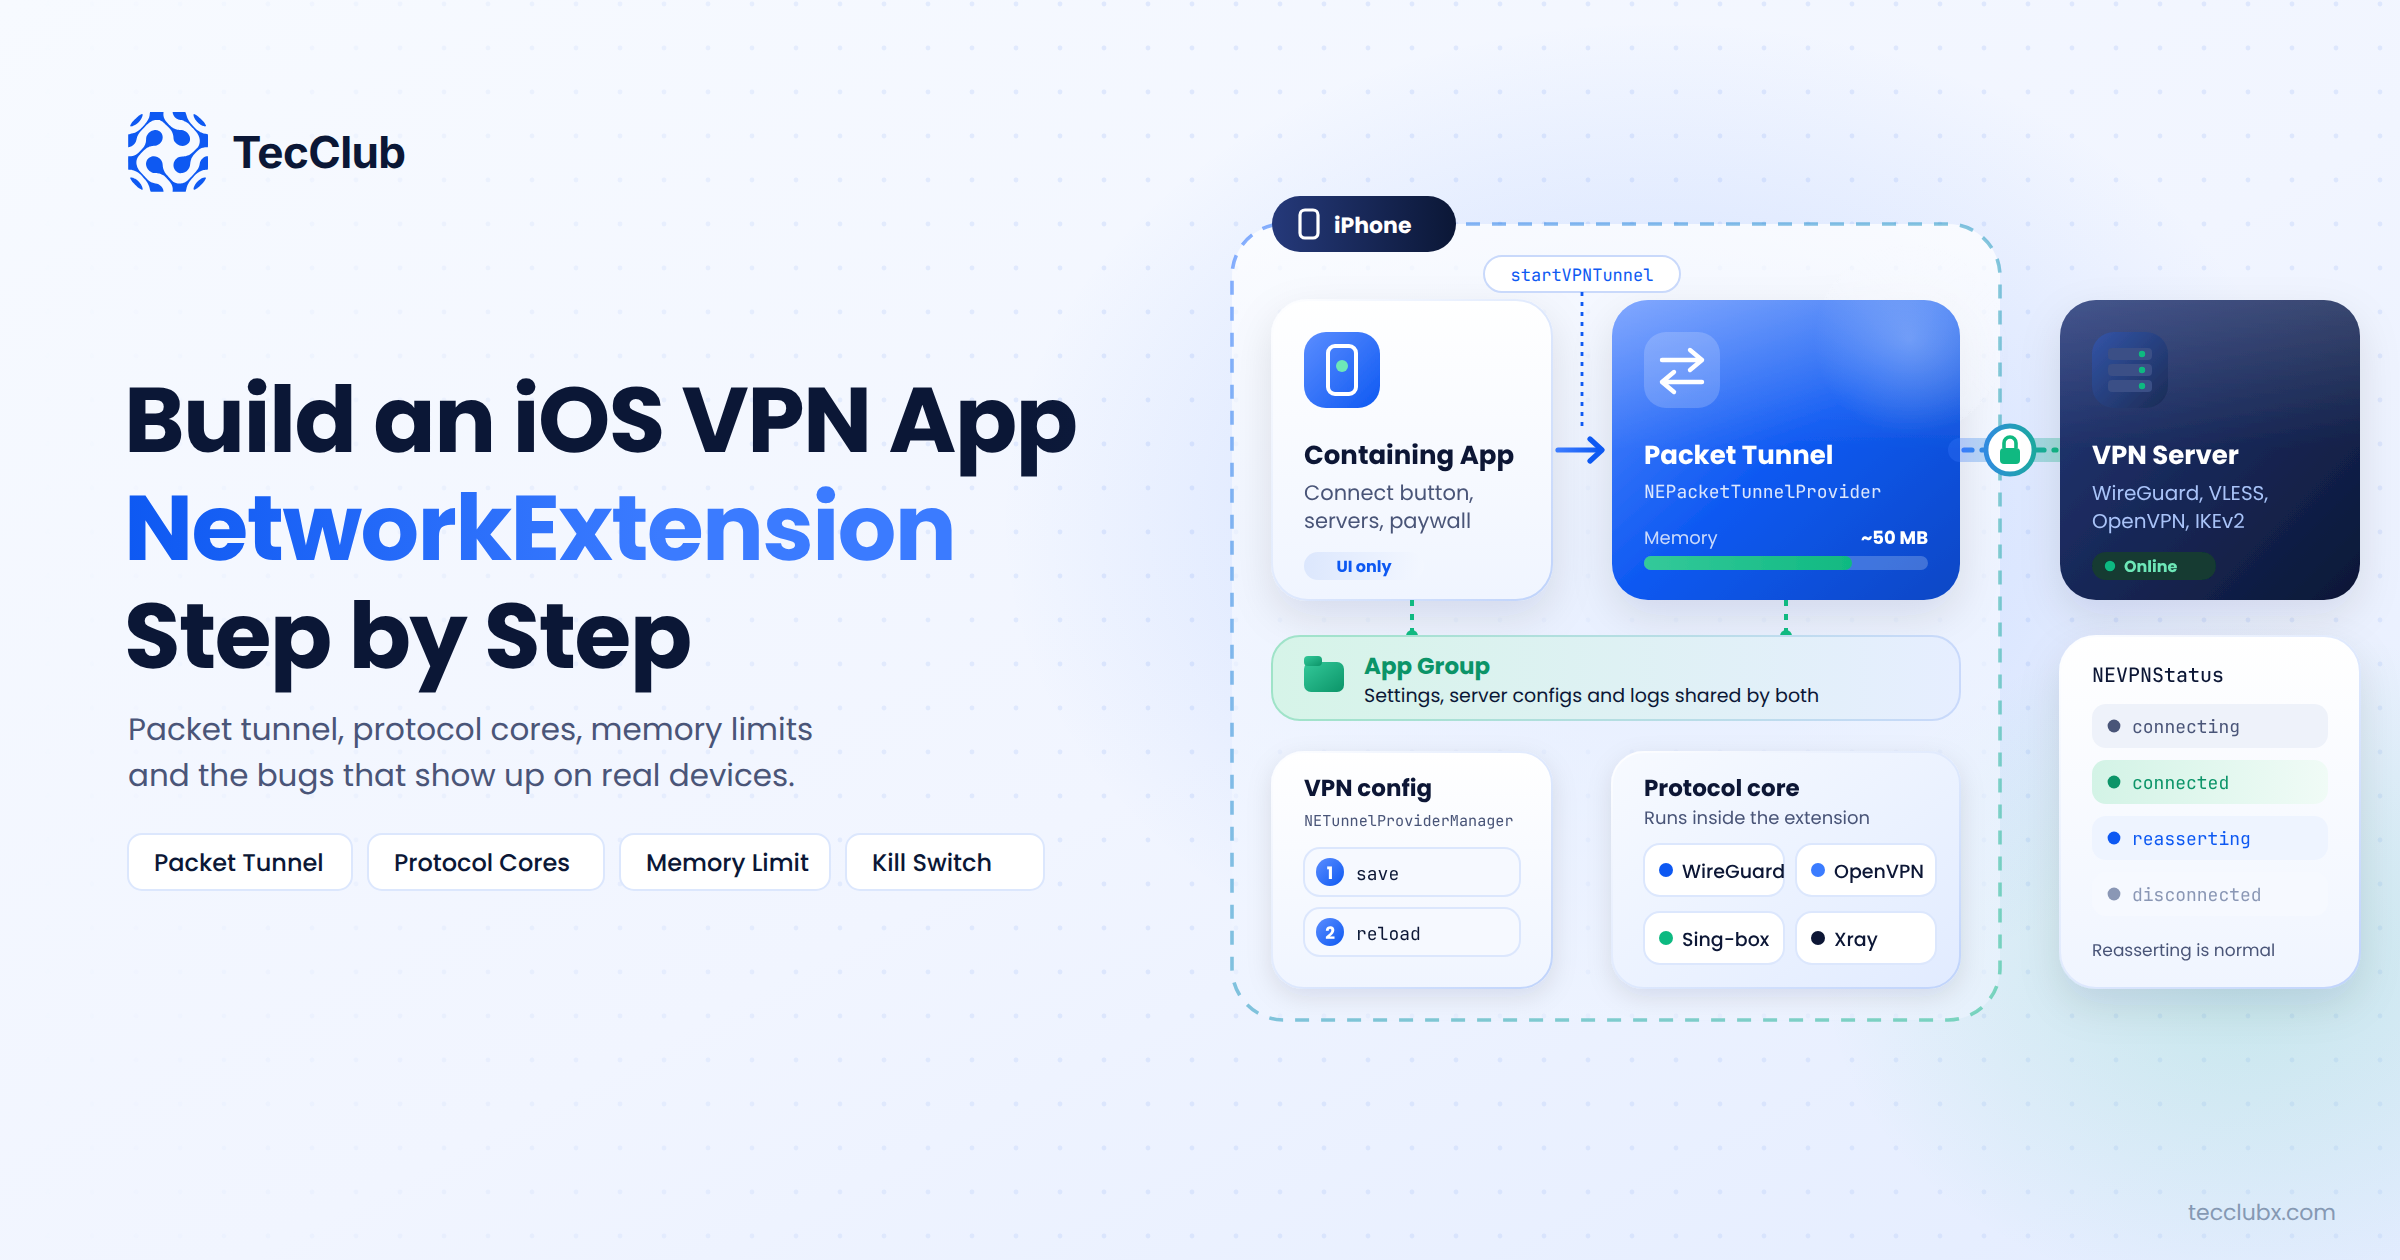
Building a VPN app for Android is mostly about one class: VpnService. On iOS, things work very differently. Apple does not let a normal app touch network traffic at all. Instead, every VPN app on iPhone runs its tunnel inside a separate piece of code called a Network Extension, with its own rules, its own memory limit and its own way of talking to your app.
We have shipped iOS VPN apps with WireGuard, OpenVPN, IKEv2 and VLESS for our own products and for clients. This guide explains how an iOS VPN app is put together with the NetworkExtension framework, step by step, and the problems that usually show up only after the first build runs on a real device.
What You Need Before You Start
- A paid Apple Developer account, enrolled as an organization. Apple's App Review Guidelines (5.4) require VPN apps to be published by an organization, not an individual account.
- A real iPhone or iPad. Packet tunnel extensions do not run in the iOS Simulator, so all VPN testing happens on a device.
- The Network Extensions capability with the Packet Tunnel entitlement, enabled for both the app and the extension.
- An App Group so the app and the extension can share settings, server configs and logs.
How an iOS VPN App Is Structured
An iOS VPN app is really two programs that ship together:
- The containing app. This is what users see: the connect button, the server list, the paywall, the settings. It creates and controls the VPN configuration, but it never touches packets.
- The Packet Tunnel Provider extension. A subclass of
NEPacketTunnelProviderthat iOS starts in its own process when the VPN connects. It sets up the virtual network interface and moves packets between the device and your VPN server.
The two run separately. Your app can be closed or killed while the tunnel keeps running in the background. That is exactly what users expect from a VPN, but it means you need to design how the two parts share data from day one.
Step 1: Create the Packet Tunnel Extension
In Xcode, add a new target and choose Network Extension, then Packet Tunnel Provider. Xcode creates a class that subclasses NEPacketTunnelProvider with two key methods: startTunnel(options:completionHandler:) and stopTunnel(with:completionHandler:).
Turn on the same App Group for the app and the extension, and give the extension a bundle ID under your app's ID, for example com.yourbrand.vpn.tunnel. You will need that bundle ID in the next step.
Step 2: Save a VPN Configuration from the App
The app talks to the system through NETunnelProviderManager. The usual flow looks like this:
- Call
loadAllFromPreferencesto check if your app already saved a VPN configuration. - If not, create a new manager and set its
protocolConfigurationto anNETunnelProviderProtocol. SetproviderBundleIdentifierto your extension's bundle ID andserverAddressto a display value. - Put the server details your extension needs (or a reference to them) in
providerConfiguration. - Give it a clear
localizedDescription, such as your brand name. Users see this in Settings. - Call
saveToPreferences. The first time, iOS shows the "Add VPN Configurations" permission prompt. - Call
loadFromPreferencesagain before connecting. Skipping this reload is a classic cause of a first connection that silently fails.
The VPN permission prompt is a key moment for conversion. Explain what is about to happen on the screen just before it, in one short sentence, so users do not tap "Don't Allow" out of surprise.
Step 3: Start and Watch the Connection
To connect, call startVPNTunnel(options:) on the manager's connection. You can pass options, such as the selected server, that the extension receives in startTunnel.
To keep the UI in sync, listen for the NEVPNStatusDidChange notification and read connection.status. The states you will see are disconnected, connecting, connected, reasserting and disconnecting. Reasserting is common on mobile, for example when the user moves from Wi-Fi to 5G, so treat it as a normal state and not an error.
Step 4: Build the Tunnel Inside the Extension
When iOS calls startTunnel, the extension has three jobs:
- Read the configuration from the provider configuration, the options or the shared App Group.
- Apply network settings. Create
NEPacketTunnelNetworkSettingswith the server address, the tunnel IP address inNEIPv4Settings(andNEIPv6Settingsif you support IPv6), routes such asNEIPv4Route.default()to send all traffic through the tunnel,NEDNSSettingsfor your DNS servers, and an MTU. Then callsetTunnelNetworkSettings. - Move the packets. Either read and write packets yourself through
packetFlow, or hand the tunnel to a VPN core that does it for you.
Call the completion handler only when the tunnel is really ready. If you call it too early, the app shows "Connected" while traffic still goes nowhere.
Step 5: Plug In a VPN Protocol Core
Very few teams write a VPN protocol from scratch. On iOS you normally embed an existing core inside the extension:
- WireGuard: the official WireGuardKit, built for exactly this setup.
- OpenVPN: an OpenVPN library adapted for the packet tunnel provider.
- IKEv2: built into iOS through
NEVPNProtocolIKEv2, with no extension needed if IKEv2 is all you use. - VLESS, Reality, Hysteria2, Shadowsocks: usually through Sing-box or Xray, compiled from Go into an XCFramework with gomobile.
Multi-protocol apps often use Sing-box as one core for many protocols. We explain the reasons in why Sing-box is ideal for custom VPN app development.
The Memory Limit: The Problem Nobody Mentions Early
iOS gives packet tunnel extensions a strict memory budget, around 50 MB on recent iOS versions. Go a little over and iOS kills the extension without warning. To the user, the VPN simply drops.
Go-based cores are the most common cause, because the Go runtime and large routing rule sets use memory fast. What helps:
- Keep routing and geo rule files small, or load only what the user needs.
- Tune the Go garbage collector and set a memory limit in the core.
- Do not load images, analytics SDKs or large libraries into the extension.
- Test long sessions with heavy traffic, such as a video call or a large download, and watch memory in Xcode.
Auto-Connect and Kill Switch on iOS
Auto-connect is done with on-demand rules. Add an NEOnDemandRuleConnect to the manager (for example, for all networks, or only for Wi-Fi) and set isOnDemandEnabled to true. iOS will then start the tunnel by itself when the rule matches.
Kill switch behavior comes from includeAllNetworks on the protocol configuration. When it is on, iOS blocks traffic outside the tunnel while the VPN is meant to be active. Test it carefully, because it also affects local network access and some system services. We cover how these features work across platforms in developing a VPN with kill switch, split tunneling and auto-connect.
One honest note: split tunneling by app, which is common on Android, is not available to regular App Store VPN apps on iOS. You can route by IP range and domain, but not by app.
Sharing Data Between the App and the Extension
Because they run in separate processes, the app and the extension cannot call each other directly. The common options are:
- App Group storage: shared UserDefaults or files for settings, server configs and logs.
- Provider messages: the app calls
sendProviderMessageon the session, and the extension answers inhandleAppMessage. This works well for live data such as traffic stats or the current server. - Keychain access groups: for credentials and keys. Do not store secrets in plain files.
Debugging and Testing
The extension runs in its own process, so normal print statements in Xcode will not show what you need. Use os_log with a clear subsystem and read the logs in the Console app on your Mac while the iPhone is connected. You can also attach the Xcode debugger to the extension process by name once the tunnel starts.
Before release, test on real networks: switching between Wi-Fi and mobile data, locking the phone for an hour, airplane mode on and off, and connecting from the regions your users live in. Run DNS and IPv6 leak tests too. Our guide on VPN leak testing explains what to check.
A Note on macOS
The same NetworkExtension framework powers VPN apps on the Mac, so much of your code can be shared. The main difference is distribution: Mac App Store apps use an app extension like iOS, while apps distributed outside the store usually use a system extension with notarization. Decide this early, because it changes how the extension is packaged.
Final Thoughts
The NetworkExtension framework is powerful, but it is strict. Most iOS VPN problems come from the same few places: a configuration that was not reloaded, a completion handler called too early, an extension that runs out of memory, or data that was never shared properly with the app. Plan for these from the first sprint and the rest of the build gets much smoother.
Building a VPN App for iPhone?
TecClub builds iOS and macOS VPN apps on NetworkExtension with WireGuard, OpenVPN, IKEv2 and VLESS/Reality, and takes them through App Store review. We can build your iOS app from scratch or fix one that keeps dropping connections.
Talk to our iOS VPN team or email us at [email protected].